All the necessary information about pull up can be find in my previous article here.
One arm Push up progression
1. Wall Push up
Performed against a wall. To find the starting position, stand away from the wall and extend your arms in front of you till the tips of your fingers come in contact with the wall. If you find the exercise too hard, come a little closer to the wall. |
| Wall Push up |
2. Knee Push up
Kneel on the floor with your feet together, and your palms flat on the ground in front of you.The arms should be straight, shoulder width apart, and in line with your chest. Using the knees as a pivot, bend at the shoulders and elbows until your chest is approximately touch the floor. Pause and press back to the start position.
 |
| Knee Push up |
3. Incline Push up
Finding some raised object such as a table, put your hands on said object and perform a push up. Lower the height to increase the difficulty.4. Full Push up
See how to do a proper Push up here.5. Diamond Push up
- Put your hands close together so the thumbs and index fingers touch, then perform a push up. This will emphasis your tricep more than a normal push up.
- If this is too difficult or feels uncomfortable, put your hands just a bit closer than in a normal push up. Work on moving the hands closer together over time until you reach diamond push ups.
Diamond Push up
6. Uneven Push up
One hand resting on an object such as a bench, a basket ball, etc. The higher the object, the more the other arm will have to work, and the harder the exercise. |
| Uneven Push up. |
7. Decline Uneven Push up
Same with the uneven Push up but your feet are on a higher position than your body.8. Incline one arm Push up
Place one hand under your breastbone, and lower yourself until your chest comes into contact with the bench. |
| Incline one arm push up |
9. One arm Push up
Congratulation! You get the one arm Push ups. |
| One arm Push up |
Triple claps / Muay Thai explosive Push up Progression
Do the same steps until you get the full push up.
These explosive versions of push up must done carefully if you don't want to injure yourself.
You clap twice instead of one. It requires more explosive power. Beware of injury.
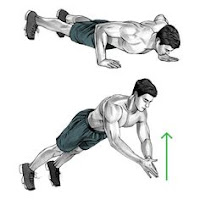
5. "Clapping" Push up
Starting position as a normal Push up. But Push yourself harder and clap your hands when your upper body are in middle of the air.
You can put a pillow under to avoid injury in the first time you do it.
DO NOT try clapping push up when you can't do about 15 good form push ups, or you will injure yourself.
 |
| Clapping Push up |
6. Incline double claps Push up
Start with your feet on a higher object.You clap twice instead of one. It requires more explosive power. Beware of injury.
7. Double claps Push up
Same as above step but your feet are on the ground.
8. Behind the back clapping Push up.
Push yourself harder. You will have enough time to clap behind the back. |
| Behind the back clapping Push up |
9. Triple claps Push up
After times and times trying! Congratulation! You've done it!!!

"I've always been a huge fan of Arnold Schwarzenegger, not just for his incredible physique but also for his commitment to helping others achieve their fitness goals. His insights on push-ups highlight the importance of proper form and progressive overload. It's a great reminder that even the most basic exercises can yield amazing results when done right."
ReplyDeletehttps://shorturl.at/vQ123