Plank

Exercise Overview

Plank is one of the best core exercises. You hold your body in a straight line over a period of time, the longer is the better. It sounds simple, but it is not that easy. The plank and all its variations will work your core muscles (the rectus abdominals and the obliques, as well as stabilizing deep core muscles) isometrically.
It is a foundation of all good bodyweight programs, and a great introduction to static, isometric work.
And like almost calisthenics exercises, it requires no equipment and can be performed just about anywhere (well, use your judgment).
Plank muscle worked, plank progression
Plank muscle worked

The progression

Choose one of the following variations as a starting point and hold the position for 30 seconds. Gradually build up to a hold of one minute over time. When you can do the exercise for one minute, move on to the next variation in the progression.


1. Kneeling plank. 

Plank progression
Performed on your knees, with thighs and spine in line.


2. Kneeling side plank. 

Plank progression

Bend your legs at the knee at a right angle and keep your thighs and torso in line. Your forearm, elbow, knee and lower leg are your points of contact with the ground.

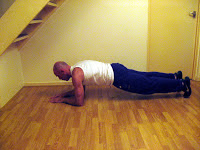
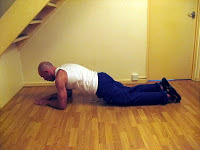
3. Plank. 

Plank prgression

With your weight resting on your toes and forearms, keep your core muscles tight and remember to breathe throughout the duration of the exercise.


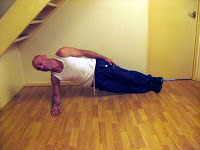
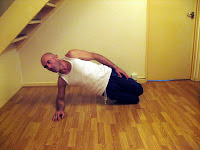
4. Side plank. 

Plank progression

Can be performed with your upper arm at your side, or in the air. Aim for 30 seconds on each side, with a quick transition between the two.


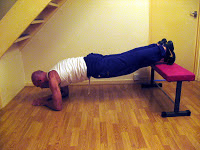
5. Decline plank.
 

Plank progression

Performed with feet elevated on a bench. Keep a straight back and remember to breathe throughout the exercise.

6. Leg lift plank. 

Plank progression

From the plank position, lift a leg straight behind you, parallel with the floor. Hold one side for up to 30 seconds; then change legs for the remaining 30s.

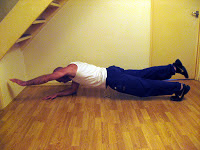
7. Arm and leg lift plank.

Plank progression

 From the plank position, lift a leg up and its opposite arm. Keep a horizontal back throughout the exercise. Hold one side for up to 30s; then switch arms and legs for the remaining 30s.

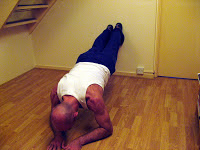
8. Wall plank. 

Plank progression

Performed with your feet flat against a wall. Prop yourself hard on your forearms and dig the soles of your feet hard into the wall.
Common mistakes


1. Collapsing the lower back.

The Fix: Instead of compromising the lower back by dipping the bum, engage the core by imagining your belly button pulling in toward the spine. This will help keep the torso flat, and in turn, the spine safe. If you want to get super technical, have a friend gently place a broomstick or yardstick on your back—the top of the stick should make contact with the head, and the bottom of the stick should rest between the buttocks. The stick should also make contact right between the shoulder blades for proper alignment.

2. Reaching the butt to the sky.

The Fix: Planks aren’t supposed to look like a downward dog. To really get the core working the way it should in the plank position, keep your back flat enough so your abs feel engaged from top (right below the sternum) to bottom (directly below the belt). Just don’t dip the tush too far toward the ground.

3. Letting the Head Drop

The Fix: While the focus may be on keeping the hips, butt, and back in the proper position, form isn’t only about the core and the lower body in this move. It’s important to think of the head and neck as an extension of your back. Keep your eyes on the floor, letting them rest about a foot in front of the hands, which will help keep the neck in a neutral position.

4. Forgetting to breathe.

The Fix: It’s human nature to hold your breath when in a strenuous position for a period of time. But denying yourself oxygen can bring on dizziness or nausea, which is unpleasant at best and dangerous at worst.

Comments

Popular posts from this blog

Push up Progression

Choose one of the following variations as a starting point and perform 3 sets of between 4 and 8 repetitions with periods of between 1 and 2 min of rest between each set. When you can do 3 sets of 8, move on to the next exercise in the progression. All the necessary information about pull up can be find in my previous article  here . One arm Push up progression 1. Wall Push up Performed against a wall. To find the starting position, stand away from the wall and extend your arms in front of you till the tips of your fingers come in contact with the wall. If you find the exercise too hard, come a little closer to the wall. Wall Push up 2. Knee Push up Kneel on the floor with your feet together, and your palms flat on the ground in front of you. The arms should be straight, shoulder width apart, and in line with your chest. Using the knees as a pivot, bend at the shoulders and elbows until your chest is approximately touch the floor. Pause and press b...

Squats

Maybe I don't have to talk much here. Everyone should know about the Squats and  the two basics steps to do them. Sit down and Stand ups. That is it ! Bodyweight Squat Squat muscle targeted Muscle targeted Squats will work your entire lower body. They primarily target the muscles in your butt (gluteus maximus), the front of your legs (quadriceps) and the back of your legs (hamstrings). But they also engage some stabilizing muscles: your lower back (erector spinae), the outside of your thighs and bum (abductors), your inner thighs (adductors) and your calves (gastrocnemius and soleus). Tips for a proper squats Different depths of motion in squatting develop different muscles. A full range of motion develops all the muscles equally. For this reason, you should aim to master full squats. Some of the steps are half-movements, but they eXist only as stages in the process towards full squats. Half-movements must always be performed in conjunction with full movements. ...

Legs raise progression

Leg raise is one of the best exercise for your core. It will help you develop not just a strong core, but functional too. Leg raise work the whole abdominals or "Abs" muscle and the obliques. Along with a appropriate diet program, you will get your sick-pack. Like other exercise in the series, you start by choosing one of the following variations as a starting point and perform 3 sets of between 4 and 8 repetitions with periods of between 1 and 2 min of rest between each set. When you can do 3 sets of 8, move on to the next exercise in the progression. 1. Knee tuck Knee tuck Sit on the edge of a chair or bench. Lean back a little, grip the edge of the seat with your hands, and straighten your legs. Your feet should be together with the heels raised a few inches from the floor.Then smoothly bring the knees up and in until they are approximately six to ten inches from your chest. Exhale as you draw the knees in. By the time the motion is complete, you should have...